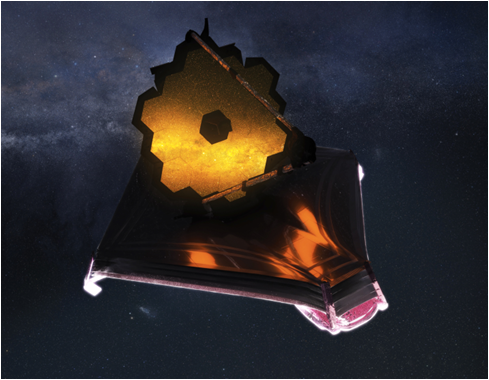
The James Webb Space Telescope (JWST) launched in December 2021 to enormous fanfare and worldwide interest. The last time the world paid this much attention to a space launch was 1990 when the Hubble Telescope launched. Space travel had largely taken a backseat since the Shuttle program was retired in 2011, that is until the JWST launched. The JWST gave the world a new reason to look up at the stars again and new eyes with which to see those stars.
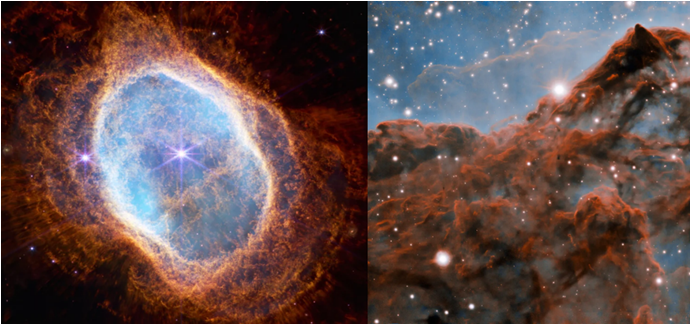
My family’s fascination with the James Webb Space Telescope was no exception. Delays in the launch of the JWST put off the launch until Christmas Day, which made it all the more fascinating. We watched the launch in awe on Christmas morning as we opened our presents and sang Christmas carols. When the first images from the JWST were released in July 2022 we were not disappointed. The first views we received were sweeping panoramic views of the cosmos with a clarity that we could only dream of.
The excitement of watching a successful launch and viewing those first amazing images made me want to get in on the excitement. What better way to celebrate the accomplishment than with hot, fresh cookies that bear the likeness of the Webb itself!
Designing a space-worthy cookie cutter in Fusion 360
I wanted a cookie cutter that said “James Webb” when you looked at it and made the cookies that looked like the iconic mirror section of the James Webb. To do this, I modeled the mirror section in Fusion 360, a cloud-based CAD tool. Fusion 360 is a one stop CAD software for anyone who wants to model 2D and 3D geometry for 3D printing, CNC machining and more.
I wanted this print to be both pretty and functional so that it accomplished the following goals;
- Cuts a cookie into likeness of the iconic James Webb mirror section.
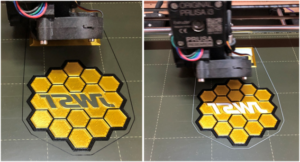
- The cutter’s face resembles the James Webb mirror section, including both black and gold colored sections using multiple 3D printing filaments.
- Include the JWST logo on the cookie cutter.
I knew that I wanted to print this in multiple colors to match the actual mirror section and to make a bold statement. To ensure the cookie cutter had a smooth face I would print it face down with the cosmetic features in contact with the bed. This makes the face’s surface as flat and smooth as possible, giving it a glossy finish. I divided this model into two sections; a thin section, only 0.5 mm thick, comprised of the cosmetic features, and a thicker section for the cookie cutter. I’d print multiple colors in the thin section to keep the color changes down, and print the remainder in one color.
I started by modeling the iconic 18 segment mirror section and then the outer perimeter ring. To allow for the addition of the JWST logo in the center of the face, I joined the central mirror segments. I added the JWST logo to the face of the cookie cutter using a stylized font that closely matched the NASA version. I extruded each of these features separately to a depth of 0.5 mm. This would allow me to 3D print at 0.15 mm layer height for a total of 3 layers; enough to ensure the colored sections were well defined while minimizing the total number of filament changes needed. Finally I extruded the actual cookie cutter geometry off the back of the colored face. Save the final model as an STL file and you are good to go.

Tip: when saving the model as an STL, check the resolution size to avoid getting blocky models, which may make your design appear blocky and lose the design intent.
Slicing the model into g-code for the 3D printer
My 3D printer of choice is the Prusa MK3S+ 3D. At around $800 it’s very dependable for a hobby level 3D printer, delivering great prints without the need to constantly tinker with or repair it. Prusa provides slicer software, appropriately titled called Prusa Slicer, that converts the STL from CAD into g-code that tells the printer how to make it.
I wanted to use three colors for this print; gold for the mirrors, black for the outer perimeter and cookie cutter and white for the JWST logo. You can use as many colors as you want, but each print layer will require multiple color changes, which gets tedious. All of the filament used will be PLA.
Start by importing the STL into the slicer. I placed the cookie cutter face down on the build plate. This will give the front face that smooth glossy look that I’m going for. Set the layer height and nozzle diameter. I’m using 0.15 mm layer heights and a 0.4 mm nozzle for this project, which are fairly standard values.
Find the model in the menu to the right, titled “webb cookie cutter” under “Infill”, right click it and select “Split” and “Objects” to divide the model into different objects.
Tip: This assumes you set the CAD model up with this process in mind. If you did, the slicer will divide each element into a separate object that you can easily assign different colors (extruders) to.
You should see multiple objects populate under the Webb cookie cutter, one part for each element you created in CAD. For this example my model was divided into four different objects that I can assign different colors to;
- The outer perimeter ring on the front face, black
- The gold mirror sections on the front face, gold
- The logo lettering on the front face, white
- The back of the cookie cutter, black

Tip: In this example I show three different cookie cutters on the build tray. Start with one complete cookie cutter and go through the full list of steps to set-up the multi-material process. Once that is done you can copy the cutters by using the “add instance” command to easily add new parts without repeating the set-up process.
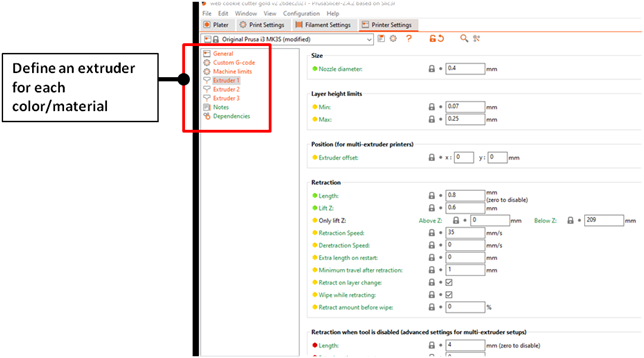
Find the “Print Settings” tab in the top left of the slicer. You’ll need to be in “Expert” mode, so go to the tabs in the top right and choose “Expert”. Don’t worry, there’s no test required to prove you are an expert! In the “Extruder” field, increase the extruder count to be equal to the number of color changes you’ll need to do. For this example I have the extruder count set to three.
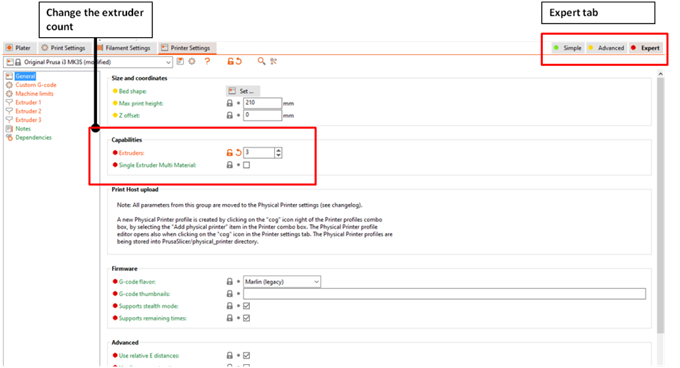
When you make this change, new extruder entries will be populated in the menu on the left of the screen, highlighted below. Each new extruder will default to copying the settings from the initial extruder (nozzle diameter, etc.) that you previously set-up. If you’re only doing a color change you should accept these settings as they are. Scroll to the bottom of each numbered extruder and choose the color of the filament. That will aid you later as you prepare to make the print.
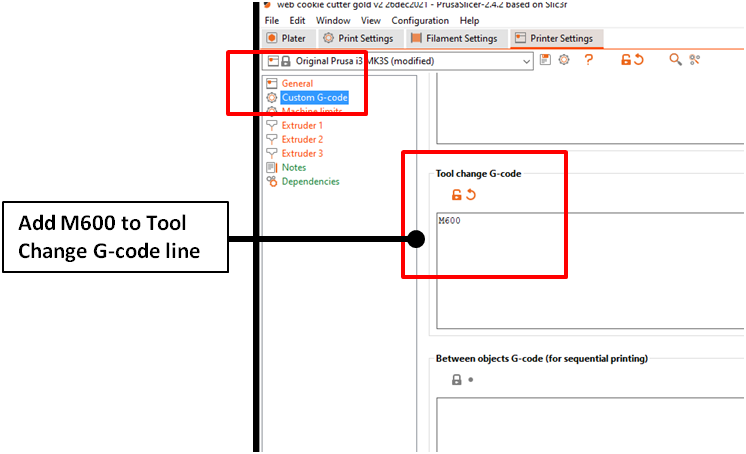
You’ll need to update the “Tool change g-code” area to tell the printer how to do a tool change. Go to the “Printer Setting” tab, choose “Custom G-code” in the left menu to see the g-code entry fields. Scroll down until you find “Tool change g-code” and add the text M600. This instructs the 3D printer to go through a tool change process when it reads the M600 command. This will prompt the printer to do the following;
- Stop printing
- Raise the print head and prompt the user to replace the filament
- Print a small volume of the new filament on the wipe tower to clear the nozzle
- Restart printing with the new filament
Updating the extruder count also adds a wipe tower to the build plate. This is a small volume that the printer uses to clear the extruder head of the previous color before printing with the new color. Here it is shown as a small block at the back of the print bed. You can modify the wipe tower settings in the “Print Settings” tab under “Wipe tower”. The default settings for the wipe tower are usually good enough, and it uses a very small amount of filament per color change so the wasted filament quantity is low.
Go into each of the individual elements in the menu and set the extruder (color) to be used in each element of the model. This will assign different colors to the elements of the model and tell the printer when to do tool changes.
Once the all the required settings have been set, hit the “Slice” button to slice the model. The slicer transitions to the 3D print screen, where you can review the 3D print process. Review the information in the box on the lower right to understand how the print process will happen.
Here the 3D printer is calling for seven total tool changes, which is easy enough to do. Following this manual tool change process for a multi-material print, you’ll probably want to stay under 20-25 tool changes.
In the figure above, you can review the model layer-by-layer to understand how the 3D printer will lay down filament. Since this model was configured to have a few color changes letters all on the bottom of the print, the color changes will happen in the first three layers. After the first three layers, the remaining layers will be made in black filament.

Locate the vertical slider on the right and scroll down to the 1st layer. Then go to the horizontal slider and scroll to the left. If you review this layer-by-layer and color-by-color, you’ll see how the 3D printer tries to make the part;
Layer 1
o Black; tool change, wipe tower, print
o Gold; tool change, wipe tower, print
o White; tool change, wipe tower, print
Layer 2
o White; print
o Black, tool change, wipe tower, print
o Gold, tool change, wipe tower, print
Layer 3
o Gold; print
o Black; tool change, wipe tower, print
o White; tool change, wipe tower, print
o Tool change to black, wipe tower
Layer 4 through 12
o Black; print, no additional tool changes
Tip: When doing this process manually, I have not found a way to prompt the user which extruder/color to install at the color change. You’ll need to write down the order of the color changes by layer and by color, either on paper, a text document or something else.
Printing the cookie cutter
When you’re happy with the sliced model, export the g-code to an SD card and take it to the 3D printer. The process for printing the model goes like this;
- Select the model to print.
- The printer will go through its start up process and do the bed leveling check.
- The printer will lay down a purge line and then does outline the print perimeter.
- The printer will go into a tool change and prompt the user to install the first color, here black.
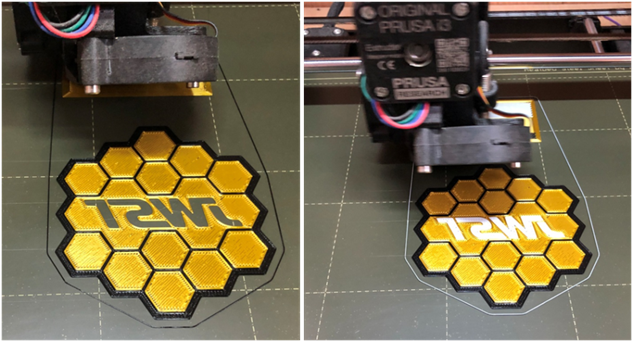
- The printer will move to the wipe tower location, dispense some filament and then move to lay down the first black layer, the outer perimeter rings.
- When the first color on layer one is completed, it will prompt the user for a tool change. Remove the black filament and install the gold filament. The printer will move to the wipe tower and dispense some filament before it is ready to print.
- The printer will print the second color on layer one, and then repeat the tool change process until the first three layers are completed.
- Once past layer three of the print, the printer will no longer call for tool changes and will print until completed. No further supervision of the print process is required.
During the first three layers, you will need to be near the printer for each of the tool changes. The Prusa will sit and wait for the tool change as long as needed, but if the tool change takes more than 15-30 minutes the heating system will power down until revived. For this model, the first three layers with color changes are estimated to take 1 hour and 33 minutes, while the total print time is around 13 hours. After the color changes are completed, you can walk away from the printer and come back to a finished part.
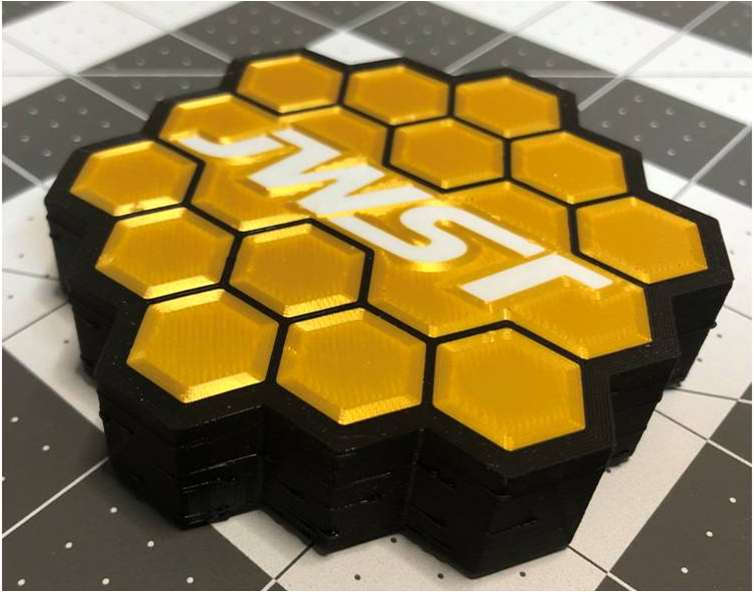
Printing the first three layers went as expected without any issues. I was using Overture PLA from Amazon, a pretty basic PLA, for all three colors and the standard PLA settings for “Prusament PLA”, 210 °C extruder and 60 °C bed temperature. The bottom layers ended up looking great, very smooth and glassy looking!
Prototype testing; let’s get baking!
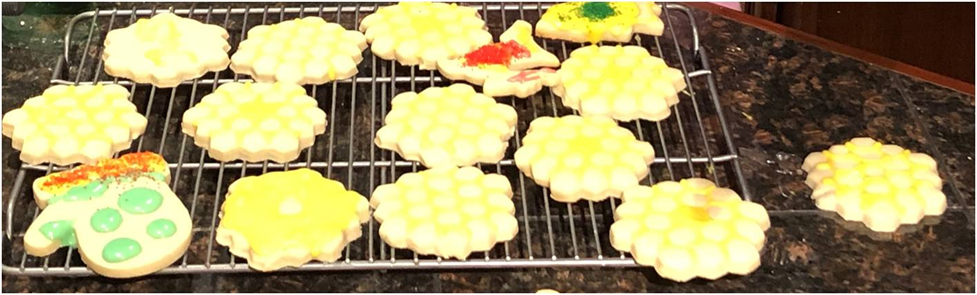
These cookie cutters were technically challenging and fun to make. Anytime you can mix science and baking it’s a good day. Once we had a working prototype of the cookie cutter in hand it was time to try it out. I designed the cutter to cut out the outline of the Webb’s mirror section and press the outline of each of the 18 mirror segments into the cookie. Overall it worked very well for cookie dough sheets from 6.3-9.5 mm (1/4” -3/8”) thick. Add a layer of gold icing to the cookie and you have a cookie that is smart, delicious and good looking.
Since these cookie cutters are made from PLA filament, they are not dishwasher safe. If you do put them in the dishwasher, they will curl up into a ball. Don’t ask me how I know this. When it’s time to clean-up, rinse them off in warm water and gently clean the cutting surfaces.
PLA is not generally food-safe, so keep that in mind. Before using the cookie cutters for the first time, take a wire brush and lightly brush the bottom side of the cookie cutter that will be in contact with the cookie. This will remove any filament stringing or loose particles left over after printing.
A PDF file of this project write-up is included. If you’re interested in making your own James Webb cookie cutters, I’ve attached the following files to the PDF version. Find them in the “comments” section of the PDF.
- Webb cookie cutter.STEP file
- Webb cookie cutter.STL file
- Webb cookie cutter.3mf file, with everything you need to recreate this in Prusa Slicer
External links
Who was James Webb? Learn more about him here
https://jwst.nasa.gov/content/about/faqs/whoIsJamesWebb.html
What is the James Webb Space Telescope? Learn all about it here
https://www.northropgrumman.com/space/james-webb-space-telescope/
All about Fusion 360 CAD software
https://www.autodesk.com/products/fusion-360/personal
All about Prusa 3D printers
https://www.prusa3d.com/

